Commits
The fundamental building blocks of Git
A commit is a snapshot of a project at a specific point in time. Think of it as a 'save point' in a video game. If you mess up your project you can go back to a working commit.
Practical One
Create a new repository
Before we create our first commit, we'll need to create a repository.
Create a new directory.
mkdir git-workshop
cd git-workshop
Initialize a git repository, we will see a hidden .git directory created in
the current directory. Let's not focus on that too much at the moment.
git init
# stdout: Initialized empty Git repository in...

ls -a
# stdout: .    ..   .git
Create a commit
We have our repository created. Let's create a new file with some text inside it.
echo 'Hello, World!' > hello.txtWe can now add the hello.txt file to the staging area, ready to be committed.
Any future changes to hello.txt will not be included in the commit we create,
unless we add them too.
git add hello.txtFinally we can create a commit using the contents of the staging area, and include a descriptive message of our changes.
# Alternatively we can just do 'git commit', which will open up an editor to
# enter the commit message.
git commit -m "Add hello.txt"
We have created a commit, now let's create another one by making some changes
to hello.txt. We'll leave this one to you, but our change could look
something like:
echo 'My name is <your-name>!' >> hello.txtViewing commit history
We have two commits created, let's take a look at the commit log.
# To exit the log simply press 'q'
git log
The commits are ordered in reverse chronological order. Each commit item contains the SHA-1 hash of the commit, the author, the date the commit was authored and the commit message. We can use the SHA-1 hash of the commit to reference it when using other git commands.
For example, we can checkout a commit:
git checkout <commit-sha-1>
cat hello.txt
# stdout: Hello, World!

# Use 'git checkout -' to checkout the previous commit.
git checkout -
cat hello.txt
# stdout: Hello, World! My name is <your-name>
Diving deeper
We covered quite a lot in the previous practical. Let's go in depth on some of the topics covered.
Adding (Staging) and Committing
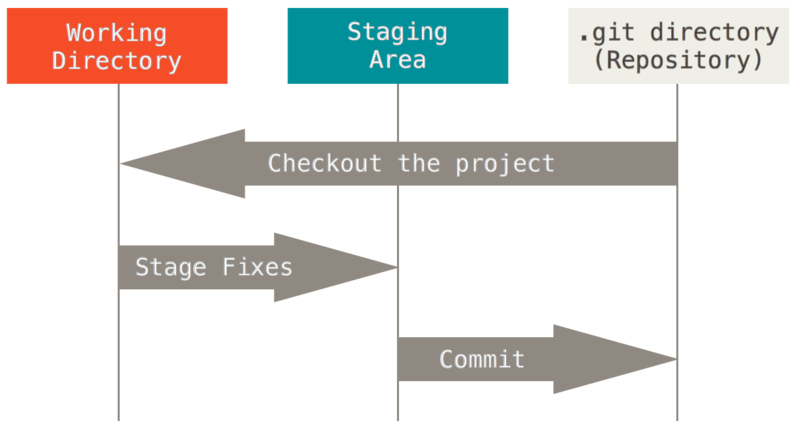
When performing a git add we mentioned the "staging area". This is one of the three sections of a git project:
The working directory - This is all the files in your current directory. This is where files are modified before being staged.
The staging area - This is where changes are added during git add, when a commit is created the changes in the staging area will be the contents of the commit.
The repository - Changes that have been committed and persisted.
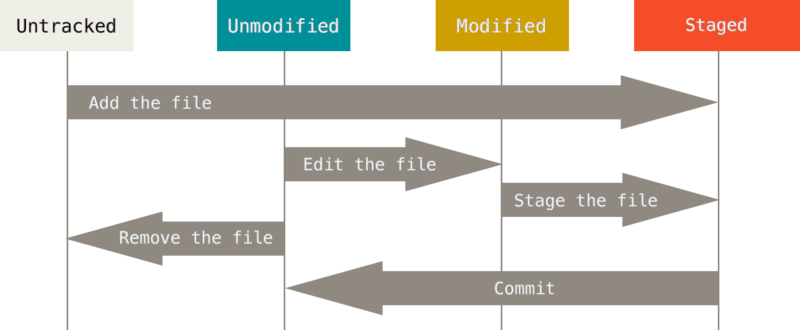
Lifecycle of files
There are two states of a file in git:
Tracked files - This is any file that is in the previous commit, or currently staged.
Untracked files - Any file that is not a tracked file.
A tracked file can be:
Modified: Changes have been made since the previous commit, but are not staged.
Staged: Changes have been made since the previous commit, and those changes are staged.
Unmodified: No changes have been made to the file since the last commit.
Practical Two
Now we know a bit more about staging and the lifecycle of a file, let's have a look at the lifecycle in action.
First, let's create a new untracked file.
echo 'My favourite colour is <your-favourite-colour>!' > colour.txtNow we want to see the status of the current project.
git statusIt tells us we have an untracked file called 'colour.txt'. As we haven't changed the contents of 'hello.txt' it is unmodified and does not show by default.
If we add 'colour.txt' to the staging area and check the status again we will
see git is now telling us the file is staged or ready to be committed, the file
is now also tracked.
git add colour.txt

git status
# Note that the output also tells us how to unstage the file, using git reset.
Now let's change the contents of 'hello.txt', the file will then become
modified and this will be shown when running git status.
echo 'I am doing a Git workshop!' >> hello.txt

git status
Finally add and commit all of the changes.