Objectives
Move the playlist model into the database. Prime the database from a YAML file.
Exercise Solutions
This is the Playlist application as completed in Lab 07b:
Below as solutions to the exercises from Lab07b
Exercise 3: Add a new playlist
Extend your version of the app to contain a new playlist - make up some songs. Verify that they are rendered as expected.
Solution
app/controllers/Dashboard.java
    //...
    Song s7 = new Song ("Opus 34: Six variations on a theme in F major", "Beethoven");
    Song s8 = new Song ("Opus 120: Thirty-three variations on a waltz by Diabelli in C major", "Beethoven");
    Playlist p3 = new Playlist("Beethoven Variations");
    p3.songs.add (s7);
    p3.songs.add (s8);
    //...
    playlists.add(p3);
    //...
Exercise 4: New Fields
Extend the song model to also have a duration field. Change the constructor to initialise this field. Modify the dashboard view to display it. Also include a duration field in the Playlist.
app/models/song.java
package models;

public class Song
{
  public String title;
  public String artist;
  public int duration;

  public Song(String title, String artist, int duration)
  {
    this.title = title;
    this.artist = artist;
    this.duration = duration;
  }
}
app/models/playlist.java
package models;

import java.util.ArrayList;
import java.util.List;

public class Playlist
{
  public String title;
  public List<Song> songs = new ArrayList<Song>();
  public int duration;

  public Playlist(String title, int duration)
  {
    this.title = title;
    this.duration = duration;
  }
}
app/controllers/Dashboard.java
    Song s1 = new Song("Piano Sonata No. 3", "Beethoven", 5);
    Song s2 = new Song("Piano Sonata No. 7", "Beethoven", 6);
    Song s3 = new Song("Piano Sonata No. 10", "Beethoven",8 );
    Playlist p1 = new Playlist("Beethoven Sonatas", 19);
    p1.songs.add (s1);
    p1.songs.add (s2);
    p1.songs.add (s3);

    Song s4 = new Song("Piano Concerto No. 1", "Beethoven", 8);
    Song s5 = new Song("Piano Concerto No. 12", "Beethoven", 12);
    Song s6 = new Song("Piano Concerto No. 23", "Beethoven", 23);
    Playlist p2 = new Playlist("Beethoven Concertos", 43);
    p2.songs.add (s4);
    p2.songs.add (s5);
    p2.songs.add (s6);

    Song s7 = new Song ("Opus 34: Six variations on a theme in F major", "Beethoven", 12);
    Song s8 = new Song ("Opus 120: Thirty-three variations on a waltz by Diabelli in C major", "Beethoven", 14);
    Playlist p3 = new Playlist("Beethoven Variations", 26);
    p3.songs.add (s7);
    p3.songs.add (s8);
Modify the dashboard view to display these new fields.
app/views/dashboard.html
#{extends 'main.html' /}
#{set title:'Dashboard' /}

#{menu id:"dashboard"/}

#{list items:playlists, as:'playlist'}
  <section class="ui segment">
    <h2 class="ui header">
      ${playlist.title}
    </h2>
    Total Duration: ${playlist.duration}
    #{listsongs playlist:playlist/}
  </section>
#{/list}
app/views/tags/listsongs.hbs
<table class="ui fixed table">
  <thead>
    <tr>
      <th>Song</th>
      <th>Artist</th>
      <th>Duration</th>
    </tr>
  </thead>
  <tbody>
    #{list items:_playlist.songs, as:'song'}
      <tr>
        <td>
          ${song.title}
        </td>
        <td>
          ${song.artist}
        </td>
        <td>
          ${song.duration}
        </td>
      </tr>
    #{/list}
  </tbody>
</tabl
Exercise 4: Extend Views
Extend the following views:
- Start: Extend the start view to contain a more detailed outline of the purpose of the application
- About: Extend the about view to provide contact details (may be fictitious) for the author/company that created the app.
app/views/start.html
#{extends 'main.html' /}
#{set title:'Start' /}

#{menu id:"start"/}

<section class="ui center aligned middle aligned segment">
  <h1 class="ui header">
    Welcome to Playlist 1
  </h1>
  <p>
    A small app to let you compose playlists. This app will allow you to create, manage and share your playlists. Simple enter the playlist details one the dashboard.
  </p>
</section>
app/views/about.html
#{extends 'main.html' /}
#{set title:'About' /}

#{menu id:"about"/}

<section class="ui center aligned middle aligned segment">
  <p>
    A Little Playlist Maker - Version 1. Prepared by Playlist Solutions, Playlist Mansions, PlaylistTown.
  </p>

</section>
Yaml
Create a new file in the conf folder of the Playlist project called data.yml. Here are its contents:
conf/data.yml
Song(s1):
  title: Piano Sonata No. 3
  artist: Beethoven
  duration: 5
Song(s2):
  title: Piano Sonata No. 7
  artist: Beethoven
  duration: 6
Song(s3):
  title: Piano Sonata No. 10
  artist: Beethoven
  duration: 8
Song(s4):
  title: Piano Concerto No. 27
  artist: Beethoven
  duration: 8
Song(s5):
  title: Piano Concertos No. 17
  artist: Beethoven
Song(s6):
  title: Piano Concerto No. 10
  artist: Beethoven
  duration: 12

Playlist(p1):
  title: Bethoven Sonatas
  duration: 19
  songs:
  - s1
  - s2
  - s3

Playlist(p2):
  title: Bethoven Concertos
  duration: 23
  songs:
  - s4
  - s5
  - s6
This is a YAML file - a notation for describing configuration data and structure information:
We will use this to describe initial values for our model objects.
Model
Revise the Model classes, by changing the structure of both model classes:
app/models/Song.java
package models;

import javax.persistence.Entity;

import play.db.jpa.Model;

@Entity
public class Song extends Model
{
  public String title;
  public String artist;
  public int duration;

  public Song(String title, String artist, int duration)
  {
    this.title = title;
    this.artist = artist;
    this.duration = duration;
  }
}
app/models/Playlist.java
package models;

import java.util.ArrayList;
import java.util.List;

import javax.persistence.CascadeType;
import javax.persistence.Entity;
import javax.persistence.OneToMany;

import play.db.jpa.Model;

@Entity
public class Playlist extends Model
{
  public String title;
  @OneToMany(cascade = CascadeType.ALL)
  public List<Song> songs = new ArrayList<Song>();
  public int duration;

  public Playlist(String title, int duration)
  {
    this.title = title;
    this.duration = duration;
  }
}
These versions are largely the same as the current version, except that there are a number of additional 'annotations':
...
@Entity
...
@OneToMany(cascade = CascadeType.ALL)
...
The purpose of these is to associated these classes with a Database.
Now modify Dashboard.java - removing all of the playlists + songs:
app/controllers/Dashboard.java
...
//    Song s1 = new Song("Piano Sonata No. 3", "Beethoven", 5);
//    Song s2 = new Song("Piano Sonata No. 7", "Beethoven", 6);
//    Song s3 = new Song("Piano Sonata No. 10", "Beethoven",8 );
//    Playlist p1 = new Playlist("Beethoven Sonatas", 19);
//    p1.songs.add (s1);
//    p1.songs.add (s2);
//    p1.songs.add (s3);
//
//    Song s4 = new Song("Piano Concerto No. 1", "Beethoven", 8);
//    Song s5 = new Song("Piano Concerto No. 12", "Beethoven", 12);
//    Song s6 = new Song("Piano Concerto No. 23", "Beethoven", 23);
//    Playlist p2 = new Playlist("Beethoven Concertos", 43);
//    p2.songs.add (s4);
//    p2.songs.add (s5);
//    p2.songs.add (s6);
//
//    Song s7 = new Song ("Opus 34: Six variations on a theme in F major", "Beethoven", 12);
//    Song s8 = new Song ("Opus 120: Thirty-three variations on a waltz by Diabelli in C major", "Beethoven", 14);
//    Playlist p3 = new Playlist("Beethoven Variations", 26);
//    p3.songs.add (s7);
//    p3.songs.add (s8);
//
//    List<Playlist> playlists = new ArrayList<Playlist>();
//    playlists.add(p1);
//    playlists.add(p2);
//    playlists.add(p3);

    render ("dashboard.html");
...
Make sure the app is compiling and running without any erors - you may need to restart to make sure. Remember, to restart you enter Ctrl-C in the console use used to start the application.
Bootstrap
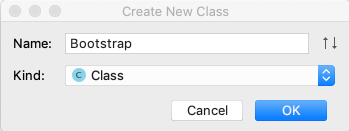
Create a new class in the app package containing this code here:
import java.util.List;
import play.*;
import play.jobs.*;
import play.test.*;
import models.*;
@OnApplicationStart
public class Bootstrap extends Job
{
public void doJob()
{
Fixtures.loadModels("data.yml");
}
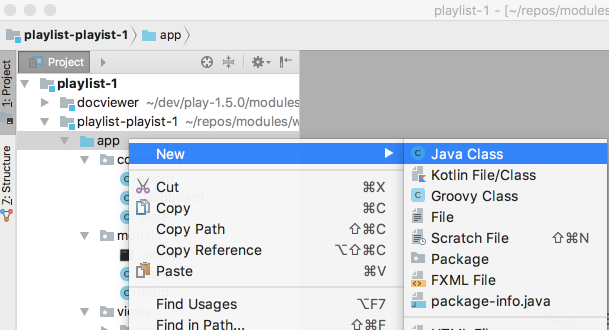
}Do this be selecting the app package, and then selecting New->Java Class
Creating the class:
The class should be in the app package:
Restart the app and keep a close eye on the console as you do this - you should see something like this:
~        _            _
~  _ __ | | __ _ _  _| |
~ | '_ \| |/ _' | || |_|
~ |  __/|_|\____|\__ (_)
~ |_|            |__/
~
~ play! 1.5.2, https://www.playframework.com
~
~ Ctrl+C to stop
~
~ using java version "1.8.0_162"
Listening for transport dt_socket at address: 8000
17:53:49,806 INFO  ~ Starting /Users/edeleastar/dev/playlist-2
17:53:49,906 WARN  ~ You're running Play! in DEV mode
17:53:50,007 INFO  ~ Listening for HTTP on port 9000 (Waiting a first request to start) ...
~ Server is up and running
17:53:59,610 INFO  ~ HikariPool-1 - Starting...
17:53:59,648 INFO  ~ HikariPool-1 - Start completed.
17:53:59,662 INFO  ~ Connected to jdbc:h2:mem:play for default
17:54:00,703 INFO  ~ Application 'playlist-2' is now started !
17:54:01,593 INFO  ~ Rendering Start
The 'Rendering' messages are familiar - but we have some new messages relating to the database.
To display the playlist from the database - here is a revised version of the dashboard controller:
app/controllers/Dashboard.java
package controllers;

import java.util.ArrayList;
import java.util.List;

import models.Playlist;
import models.Song;
import play.Logger;
import play.mvc.Controller;

public class Dashboard extends Controller
{
  public static void index()
  {
    Logger.info("Rendering Admin");

    List<Playlist> playlists = Playlist.findAll();
    render ("dashboard.html", playlists);
  }
}
Restart the project - and visit the Dashboard view. You should see the playlists in data.yml rendered to the view.
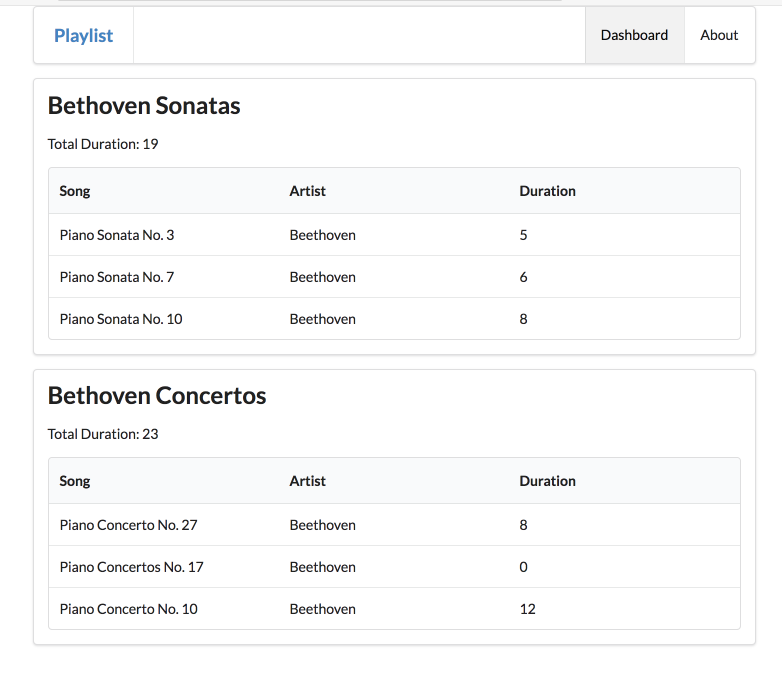
Notice in the above we are requesting all playlists from the database:
List<Playlist> playlists = Playlist.findAll();Before sending them to the view.
Database
With your application still running - visit the following url:
http://localhost:9000/@db
This should display this panel:
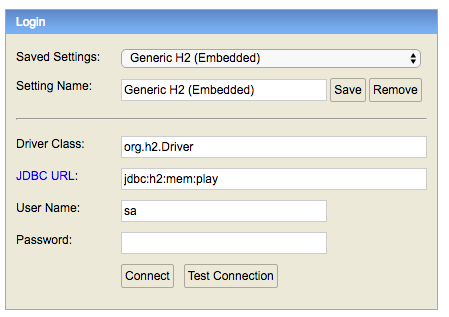
Please note - the first time your run this JDBC URL field may be:
jdbc:h2:~/test.
If this is the case, change it to
jdbc:h2:mem:play
as shown above. You should only need to do this once.
Press Connect

This is a control panel for the database our application is using. This databases is 'transient' - only containing values while it is running. When the application is terminated, the database is wiped.
However, it is a complete Relational Database - you will be exploring this type of system in semester 2.
Select 'song' in the panel in the left - and the press the green 'play' button:
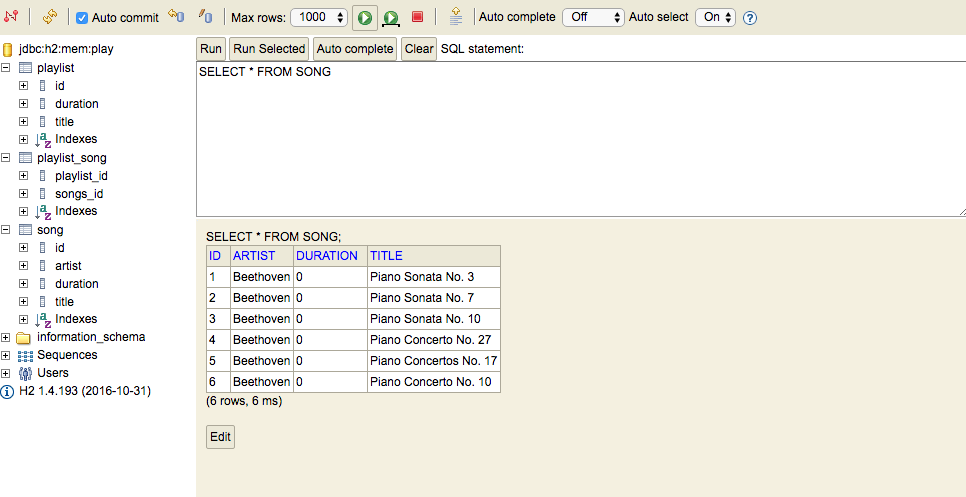
This has queried the play table - and displayed the full contents.
Try inspecting the other tables:
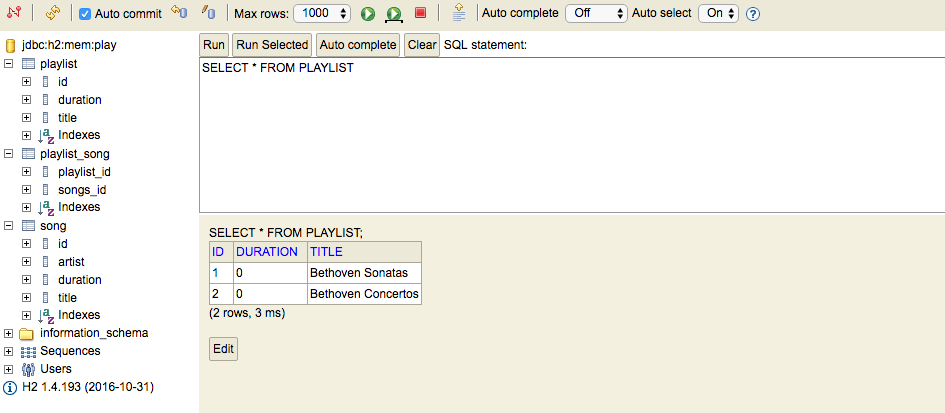
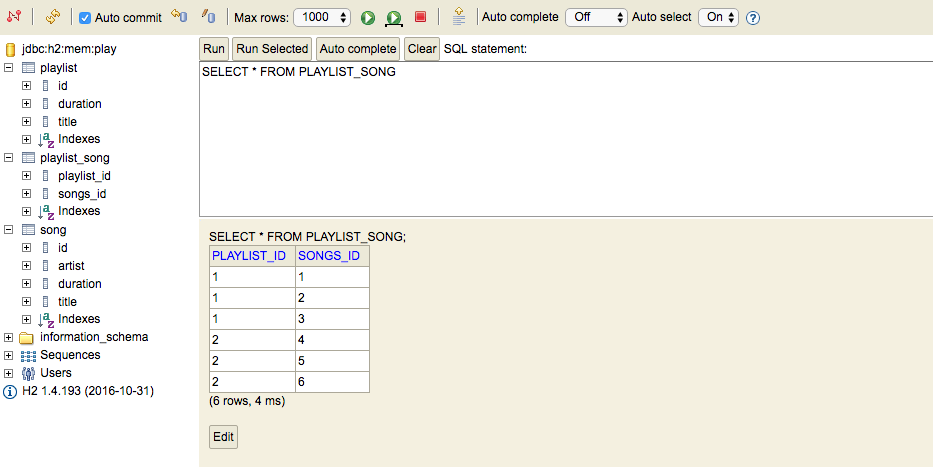
Can you make sense of these tables - and relate them to the Java model classes? In particular, can you see the role of the playlist_song table? Inspect the contents closely, paying attention to the IDs.
Exercises
Exercise 1: Download and Rename Sample Solution
A complete version of the app as it should be at the end of this lab:
However, if you already have a project called 'playlist' in Idea, then it might be confusing So, first rename the project to playlist-2 (covered in step 1 of lab07b), and then run this command:
play idealize... and then open with Idea.
Exercise 2: New Playlist
Working only in the data.yml, create a new Playlist. If this works correctly, you should see the playlist in the dashboard just by restarting the application.
Exercise 3: Admin Panel
This is a challenging exercise - but the hints provide most of what you need.
Problem: We would like an 'admin' interface to the application, which displays all the songs in the database - ignoring the playlists they belong to for the moment. The view should also display the IDs of the songs:
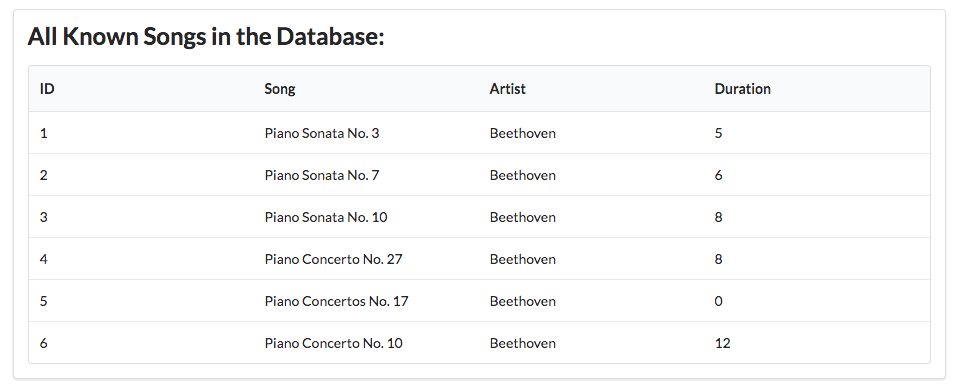
This is a 'hidden' view, that does not appear in the menu. It is accessed by browsing directly to:
Hints:
You will need a new route:
GET /admin Admin.index... and a matching controller + view:
Admin Controller
package controllers;

import java.util.ArrayList;
import java.util.List;

import models.Playlist;
import models.Song;
import play.Logger;
import play.mvc.Controller;

public class Admin extends Controller
{
  public static void index()
  {
    Logger.info("Rendering Admin");

    // TODO - get list of all songs, and send them to the view
    render ("admin.html");
  }
}
Admin view
#{extends 'main.html' /}
#{set title:'Dashboard' /}

#{menu id:"admin"/}

  <section class="ui segment">
  <h2 class="ui header">
    All Known Songs in the Database:
  </h2>
  <table class="ui fixed table">
    <thead>
      <tr>
        <th>ID </th>
        <th>Song</th>
        <th>Artist</th>
        <th>Duration</th>
      </tr>
    </thead>
    <tbody>

      // TODO Iterate through a list of songs and populate rows in the table.

    </tbody>
  </table>
</section>
Even more Hints!
How to read all songs form the Songs table:
List<Song> songs = Song.findAll();How to iterate through a list of songs:
       ...
      #{list items:songs, as:'song'}
         ...
         ...
      #{/list}
       ...
How to get the songs from the controller to the view:
...
  render("admin.html", songs);
...
The solution to this exercise is provided in the next lab - but try to have a go first before working through the solution.