Objectives
Review the Playlist Application
Setup
In Lab 09b, we extended the original playlist application to support the creation and deletion of playlists + songs.
This is the version as we left it:
Download this archive - unzip it, and make it available for Idea by entering:
play idealizeInside the download folder. Open the project in Idea:
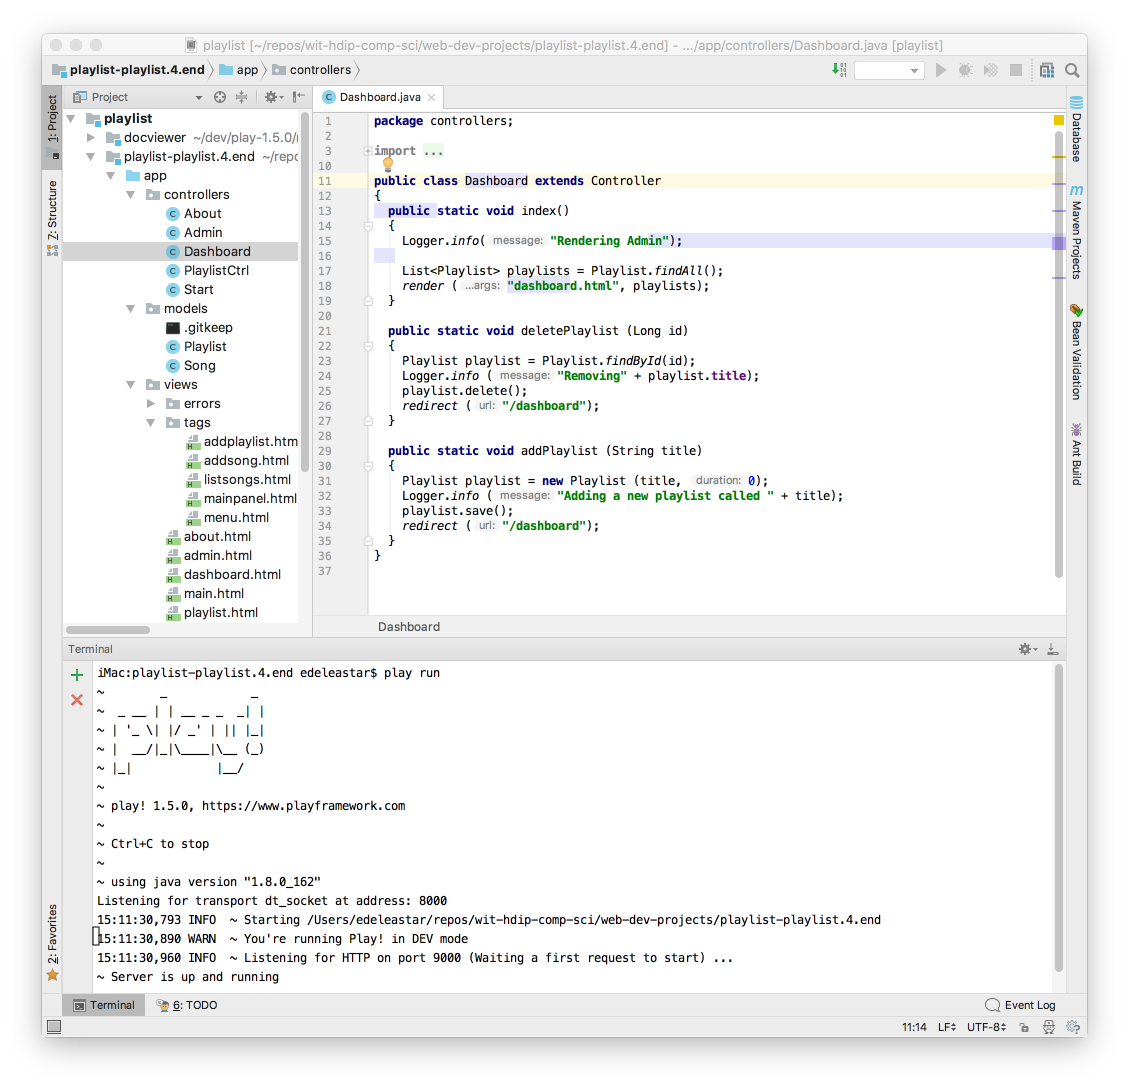
You can run the application from inside IDE via the terminal (as shown above).
Verify the basic operation of the app:
All the buttons should work
Review the Static Routes + Controllers
In order to refresh our understanding of how the application works, start by looking at the routes file:
conf/routes
GET     /                                       Start.index
GET     /dashboard                              Dashboard.index
GET     /dashboard/deleteplaylist/{id}          Dashboard.deletePlaylist
POST    /dasghboard/addplaylist                 Dashboard.addPlaylist

GET     /playlists/{id}                         PlaylistCtrl.index
GET     /playlists/{id}/deletesong/{songid}     PlaylistCtrl.deleteSong
POST    /playlists/{id}/addsong                 PlaylistCtrl.addSong

GET     /about                                  About.index
GET     /admin                                  Admin.index
Each of these represents a link that the application can serve. These links are in the various views our application presents.
Landing Page
This is the route for the entire application
GET / Start.indexit will render the start page:

This is the controller method:
app/controllers/start.java
  public static void index() {
    Logger.info("Rendering Start");
    render ("start.html");
  }
... and this is the start view:
views/start.html
#{extends 'main.html' /}
#{set title:'Start' /}

#{menu id:"start"/}

<section class="ui center aligned middle aligned segment">
  <h1 class="ui header">
    Welcome to Playlist 1
  </h1>
  <p>
    A small app to let you compose playlists. This app will allow you to create, manage and share your playlists. Simple enter the playlist details one the dashboard.
  </p>
</section>
Rendering as :
Exercise
Carry our the above inspection for the following routes:
GET     /dashboard                              Dashboard.index
GET     /about                                  About.index
GET     /admin                                  Admin.index
I.e. Examine the controller + the associated view. Perhaps put them into a single text file using sublime so you can look at each controller method + view to get familiar with the life cycle, response composition and rendered page.
Review the Dynamic Routes + Controllers
These routes here are a little different, in that they each contain at least one item in braces:
GET     /playlists/{id}                         PlaylistCtrl.index
GET     /dashboard/deleteplaylist/{id}          Dashboard.deletePlaylist
GET     /playlists/{id}/deletesong/{songid}     PlaylistCtrl.deleteSong
Take this one for instance:
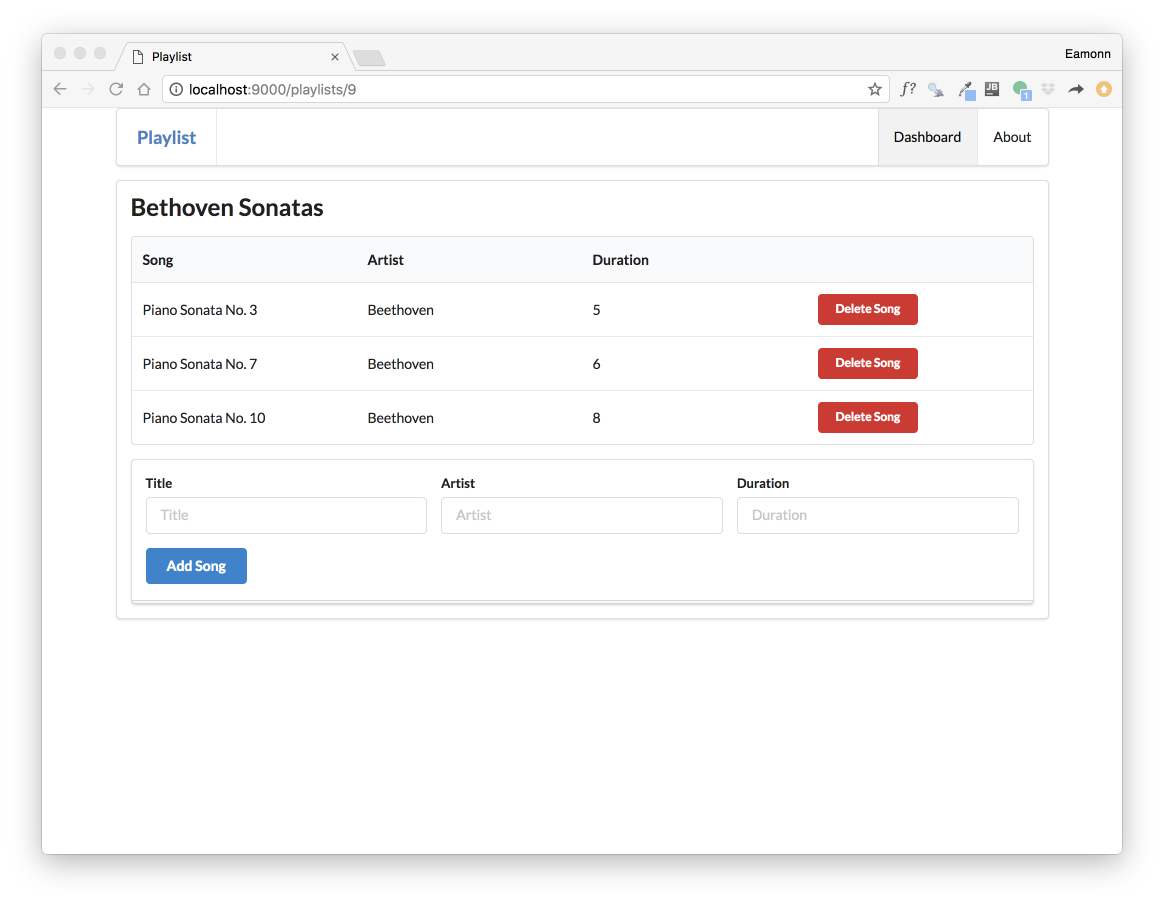
GET /playlists/{id} PlaylistCtrl.indexThis is the matching controller method:
  public static void index(Long id)
  {
    Playlist playlist = Playlist.findById(id);
    Logger.info ("Playlist id = " + id);
    render("playlist.html", playlist);
  }
and this is the view:
#{extends 'main.html' /}
#{set title:'Playlist' /}

#{menu id:"dashboard"/}

<section class="ui segment">
  <h2 class="ui header">
    ${playlist.title}
  </h2>
  #{listsongs playlist:playlist /}
  #{addsong playlist:playlist /}
</section>
This renders as:
The key aspect to note here is the {id} is replaced by an actual number (9 in the example). And this number is passed to index as id:
public static void index(Long id).. and then used to locate the specific playlist in the model:
Playlist playlist = Playlist.findById(id);This fetched playlist is then passed to the view:
render("playlist.html", playlist);.. and is in turn passed by the view to the listsongs partial:
#{listsongs playlist:playlist /}Listsongs then iterates through the array, displaying each song in turn:
<table class="ui fixed table">
  ...
    #{list items:_playlist.songs, as:'song'}
      <tr>
        <td>
          ${song.title}
        </td>
        <td>
          ${song.artist}
        </td>
        <td>
          ${song.duration}
        </td>
         <td>
            <a href="/playlists/${_playlist.id}/deletesong/${song.id}" class="ui tiny red button">Delete Song</a>
          </td>
      </tr>
    #{/list}
  ...
</table>
Sounds complicated! - However this is typical of the life cycle of requests/response in web applications.
Exercise
Try the above exercise - inspecting the life cycle of these routes:
GET     /dashboard/deleteplaylist/{id}          Dashboard.deletePlaylist
GET     /playlists/{id}/deletesong/{songid}     PlaylistCtrl.deleteSong
The last one is particularly interesting - notice there are 2 variables in braces: {id} and {songid}. Why are both needed?
Review POST Routes
The final routes of interest are the POST routes:
POST    /dasghboard/addplaylist                 Dashboard.addPlaylist
POST    /playlists/{id}/addsong                 PlaylistCtrl.addSong
POST is always used in the context of a from - and the above support forms for creating playlists or songs.
Looking at this one in more detail:
POST /dasghboard/addplaylist Dashboard.addPlaylistThis route is associated with this form:
views/tags/addplaylist.html
<form class="ui stacked segment form" action="/dashboard/addplaylist" method="POST">
  <div class="field">
    <label>Title</label>
    <input placeholder="Title" type="text" name="title">
  </div>
  <button class="ui blue submit button">Add Playlist</button>
</form>
.. and this controller method:
public static void addPlaylist (String title)
{
Playlist playlist = new Playlist (title, 0);
Logger.info ("Adding a new playlist called " + title);
playlist.save();
redirect ("/dashboard");
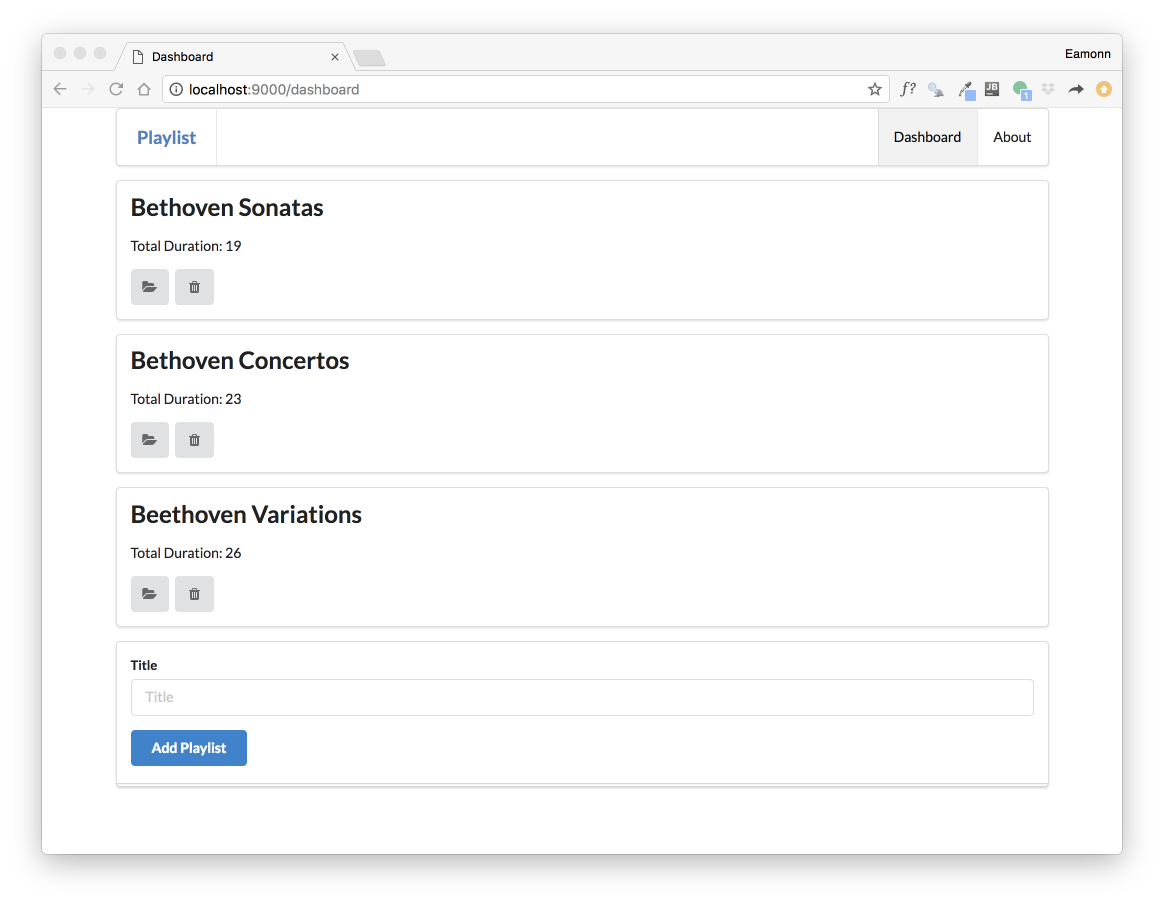
}When the method completes, it just triggers the dashboard route again:
  public static void index()
  {
    Logger.info("Rendering Admin");
    List<Playlist> playlists = Playlist.findAll();
    render ("dashboard.html", playlists);
  }
This will display the list of playlists - this time the database query will return one less.
Exercise
Inspect this route in detail:
POST /playlists/{id}/addsong PlaylistCtrl.addSongLocating:
- the view from which it is triggered
- the form that matched the route
- the controller method that is invoked
- the response that is generated
Exercises
Exercise 1: Todolist 1
Consider carrying out the same exercise for the TodoList 1 application
Exercise 2: Todolist 2
Consider carrying out the same exercise for the TodoList 2 application - this is the same application but with the addition of Session support.